Maven 代理设置 – Eclipse,命令行和全局设置
学习配置 maven https 代理设置。 默认情况下,maven 在本地系统上运行时使用默认的网络连接。 但是有时我们在工作场所或公司中运行应用。 这些网络通过代理服务器或防火墙来屏蔽互联网使用,因此从我们的系统进行的所有互联网查询都通过此代理服务器进行。
Maven 默认情况下不会检测网络代理配置,并且要在这些受限区域中使用 maven,我们必须为 maven 配置网络代理设置。
阅读更多: Maven 安装
1. 如何配置 Maven 代理设置
要设置 maven 代理设置,请执行以下步骤:
- 导航到路径 –
{M2_HOME} conf/settings.xml - 在任何文本编辑器中以编辑模式打开文件
settings.xml。 - 打开并更新
<proxy>标签。
该标签如下所示:
<settings xmlns="http://maven.apache.org/SETTINGS/1.0.0"
      xmlns:xsi="http://www.w3.org/2001/XMLSchema-instance"
      xsi:schemaLocation="http://maven.apache.org/SETTINGS/1.0.0 http://maven.apache.org/xsd/settings-1.0.0.xsd">

	<!-- proxies
	| This is a list of proxies which can be used on this machine to connect to the network.
	| Unless otherwise specified (by system property or command-line switch), the first proxy
	| specification in this list marked as active will be used.
	|-->
	<proxies>
		<!-- proxy
		 | Specification for one proxy, to be used in connecting to the network.
		 |
		<proxy>
			<id>optional</id>
			<active>true</active>
			<protocol>http</protocol>
			<username>proxyuser</</username>
			<password>proxypass</password>
			<host>proxy.host.net</host>
			<port>80</port>
			<nonProxyHosts>local.net|some.host.com</nonProxyHosts>
		</proxy>
		-->
	</proxies>

</settings>
使用您的网络特定凭据更新上述代理服务器字段。 您可以在浏览器的连接设置中找到网络代理的详细信息。 例如,可以在以下位置找到代理设置:
Internet Explorer >> tools >> internet options >> Connections >> LAN Settings

Firefox >> tools >> options >> ADVANCED TAB >> settings
2. Maven 代理设置示例
给出了示例网络代理设置条目。
<!-- proxies
| This is a list of proxies which can be used on this machine to connect to the network.
| Unless otherwise specified (by system property or command-line switch), the first proxy
| specification in this list marked as active will be used.
|-->
<proxies>
	<!-- proxy
	 | Specification for one proxy, to be used in connecting to the network.
	 |
	<proxy>
		<id>optional</id>
		<active>true</active>
		<protocol>https</protocol>
		<username>lokesh</</username>
		<password>abc123</password>
		<host>webproxy.company.com</host>
		<port>8081</port>
		<!-- <nonProxyHosts>local.net|some.host.com</nonProxyHosts> -->
	</proxy>
	-->
</proxies>
完成上述步骤后,您还应该可以在代理服务器后面使用 maven。
3. Eclipse 中的 Maven 代理设置
要在使用 Maven 时在 eclipse 中使用代理设置,请按照下列步骤操作:
- 打开 Eclipse,然后转到窗口 -> 首选项。
-
点击
User Settings的Browse按钮,并选择settings.xml。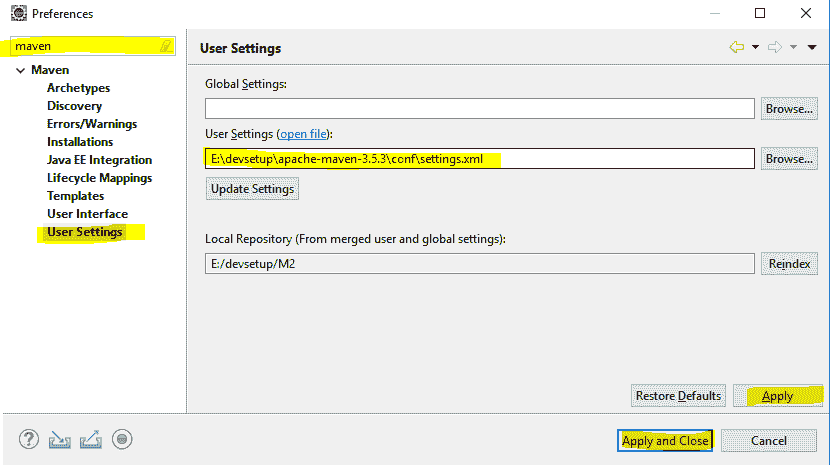
Eclipse 中的 Maven 代理
- 单击
"Update Settings"按钮更新设置。 如果出现任何确认对话框,只需单击“是”。
4. 通过命令行进行 Maven 代理设置
为了节省时间,我们可以在 maven 命令的末尾附加代理详细信息。
$ mvn clean install -DproxySet=true -DproxyHost=ur.proxy.server -DproxyPort=port
尽管可以从命令行设置 Maven 代理,但仍建议在settings.xml文件中使用全局代理设置。
学习愉快!
参考: