Dropwizard 客户端 – Jersey/HTTP 配置和示例
原文: https://howtodoinjava.com/dropwizard/client-configuration-and-examples/
我们已经使用 dropwizard 构建了 REST API。 现在,让我们构建 REST 客户端,以在整个网络上使用 REST API。 Dropwizard 同时包含 Apache HttpClient 和 Jersey 客户端。 让我们来构建它们。
阅读更多: Dropwizard HelloWorld 应用
Maven 依赖
Dropwizard 客户端模块被添加为单独的模块。
<properties>
	<dropwizard.version>1.0.0</dropwizard.version>
</properties>
<dependency>
	<groupId>io.dropwizard</groupId>
	<artifactId>dropwizard-client</artifactId>
	<version>${dropwizard.version}</version>
</dependency>
Dropwizard REST 客户端配置
Dropwizard 提供易于声明和使用的 REST 客户端配置。 您需要创建io.dropwizard.client.JerseyClientBuilder实例并为其提供io.dropwizard.setup.Environment参考。
@Override
public void run(Configuration c, Environment e) throws Exception {
	//Here we added REST Resource
	e.jersey().register(new EmployeeRESTController(e.getValidator()));

	//Now we added REST Client Resource named RESTClientController
	final Client client = new JerseyClientBuilder(e).build("DemoRESTClient");
	e.jersey().register(new RESTClientController(client));
}
要添加 HTTP 客户端,请使用以下类似的步骤:
@Override
public void run(Configuration c, Environment e) throws Exception {
	//Here we added REST Resource
	e.jersey().register(new EmployeeRESTController(e.getValidator()));

	//Now we added REST Client Resource named RESTClientController
	final HttpClient client = new HttpClientBuilder(e).build("DemoRESTClient");
	e.jersey().register(new RESTClientController(client));
}
HttpClientConfiguration的默认配置如下:
timeout: 500ms
connectionTimeout: 500ms
timeToLive: 1 hour
cookiesEnabled: false
maxConnections: 1024
maxConnectionsPerRoute: 1024
keepAlive: 0s
JerseyClientConfiguration的默认配置如下:
minThreads: 1
maxThreads: 128
gzipEnabled: true
gzipEnabledForRequests: true

//same as HttpClientConfiguration
timeout: 500ms
connectionTimeout: 500ms
timeToLive: 1 hour
cookiesEnabled: false
maxConnections: 1024
maxConnectionsPerRoute: 1024
keepAlive: 0s
Dropwizard REST 客户端资源
现在,当您可以访问 REST 客户端资源RESTClientController.java中的javax.ws.rs.client.Client或org.apache.http.client.HttpClient时,您可以使用库方法来照常调用 HTTP URI。
package com.howtodoinjava.rest.controller;

import java.util.ArrayList;

import javax.ws.rs.GET;
import javax.ws.rs.Path;
import javax.ws.rs.PathParam;
import javax.ws.rs.Produces;
import javax.ws.rs.client.Client;
import javax.ws.rs.client.Invocation;
import javax.ws.rs.client.WebTarget;
import javax.ws.rs.core.MediaType;
import javax.ws.rs.core.Response;

import com.howtodoinjava.rest.representations.Employee;

@Produces(MediaType.TEXT_PLAIN)
@Path("/client/")
public class RESTClientController
{
	private Client client;

	public RESTClientController(Client client) {
		this.client = client;
	}

	@GET
	@Path("/employees/")
	public String getEmployees()
	{
		//Do not hard code in your application
		WebTarget webTarget = client.target("http://localhost:8080/employees");
		Invocation.Builder invocationBuilder =  webTarget.request(MediaType.APPLICATION_JSON);
		Response response = invocationBuilder.get();
		@SuppressWarnings("rawtypes")
		ArrayList employees = response.readEntity(ArrayList.class);
		return employees.toString();
	}

	@GET
	@Path("/employees/{id}")
	public String getEmployeeById(@PathParam("id") int id)
	{
		//Do not hard code in your application
		WebTarget webTarget = client.target("http://localhost:8080/employees/"+id);
		Invocation.Builder invocationBuilder =  webTarget.request(MediaType.APPLICATION_JSON);
		Response response = invocationBuilder.get();
		Employee employee = response.readEntity(Employee.class);
		return employee.toString();
	}
}
在上面的类中,我访问了在 dropwizard HelloWorld 教程中创建的 REST API。
访问 API 之后,我以纯文本形式返回了响应,如下图所示。
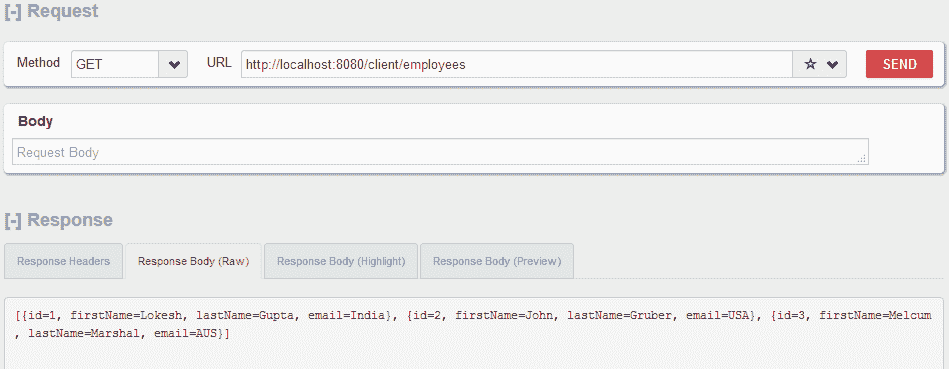
DropWizard REST 客户端
我已将客户端资源类的上下文路径设置为/client/,以在逻辑上分离客户端端点和服务端点的 URI。
阅读更多 :
将我的问题放在评论部分。
学习愉快!