Consul 服务注册和发现示例
https://howtodoinjava.com/spring-cloud/consul-service-registration-discovery/
学习基于 Spring cloud 创建微服务,在 HashiCorp Consul 注册表服务器上注册以及其他微服务(发现客户端)如何使用它来注册和发现服务以调用其 API。
我们将使用基于 Spring Boot 的 Spring Cloud API。 我们将使用 Consul 注册表服务器来构建服务注册表服务器和通用发现客户端,后者将自行注册并发现其他服务以调用 REST API。
总览
Consul 提供服务发现,配置管理,运行状况检查和键值存储等多种功能。今天,我们将专注于服务注册和发现部分。 我们将开发以下组件来构建分布式生态系统,其中每个组件都相互依赖,但是它们之间的耦合非常松散,当然还有容错能力。
- Consul 代理 – 在充当发现/注册服务器功能的
localhost上运行。 - 学生微服务 – 将基于学生实体提供一些功能。 这将是一个基于 REST 的服务,最重要的是它将是一个发现服务客户端,该客户端将与 Consul 服务器/代理对话以在服务注册表中注册自己。
- 学校微服务 – 与学生服务的类型相同 – 唯一增加的功能是它将通过服务查找机制调用学生服务。 我们不会使用学生服务的绝对 URL 与该服务进行交互。 我们将使用 Consul 发现功能,并在调用该功能之前先使用它查找学生服务实例。
这是相同组件的整体组件交互图。
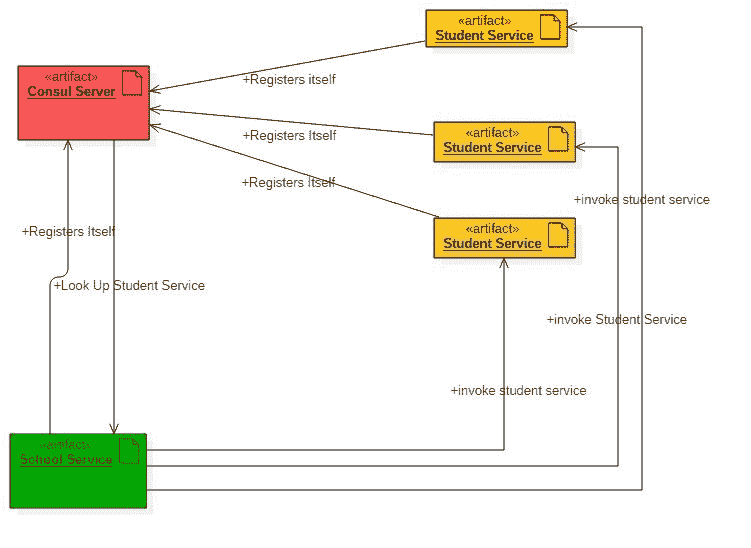
组件图
技术栈和运行时
- Java 1.8
- Eclipse IDE
- Consul 即服务注册服务器
- SpringCloud
- SpringBoot
- SpringRest
- Maven
在本地工作站中配置 Consul
在开始练习之前,我们需要首先在localhost中下载,配置和运行 consul 代理。
- 从 Consul 页面网站下载。 根据操作系统选择特定的程序包。 下载压缩文件后,我们需要将其解压缩到所需位置。
-
在本地工作站上启动 Consul 代理 – 我们已解压缩的 Zip 文件只有一个名为
consul.exe的 exe 文件。 我们将在此处启动命令提示符,并使用以下命令启动代理。consul agent -server -bootstrap-expect=1 -data-dir=consul-data -ui -bind=192.168.6.1确保输入正确的绑定地址,根据局域网设置的不同,绑定地址会有所不同。 在命令提示符下执行
ipconfig以了解您的 IpV4 地址,并在此处使用它。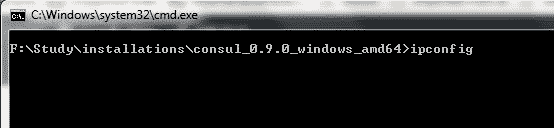
ipconfig命令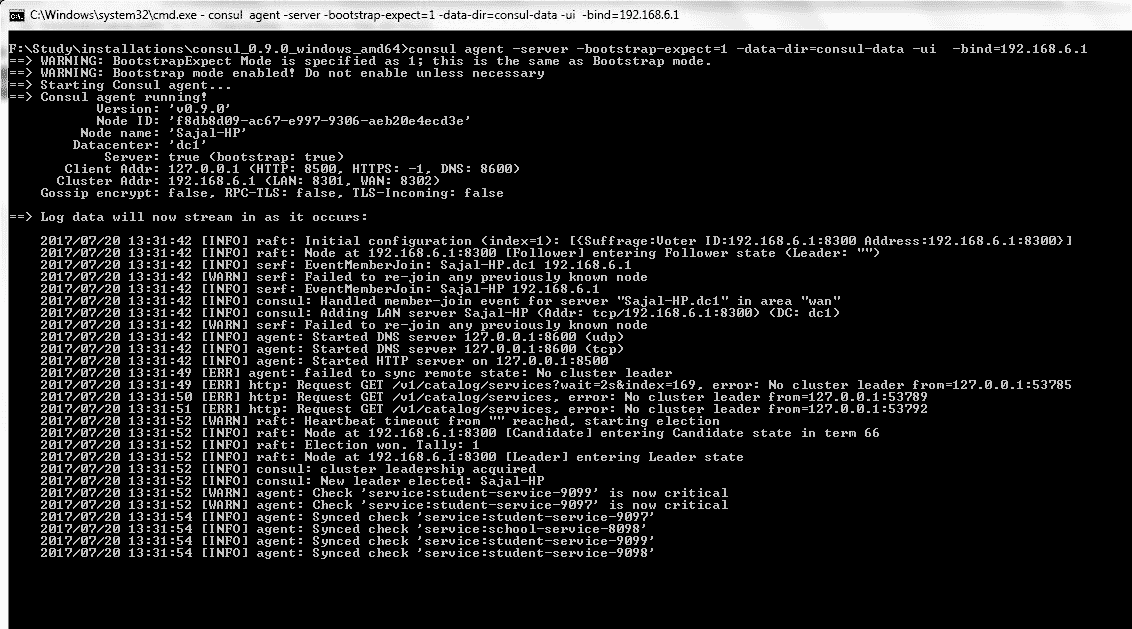
代理启动命令日志
-
测试 Consul 服务器是否正在运行 – Consul 在默认端口上运行,并且代理成功启动后,浏览
http://localhost:8500/ui,您应该会看到一个 控制台屏幕如: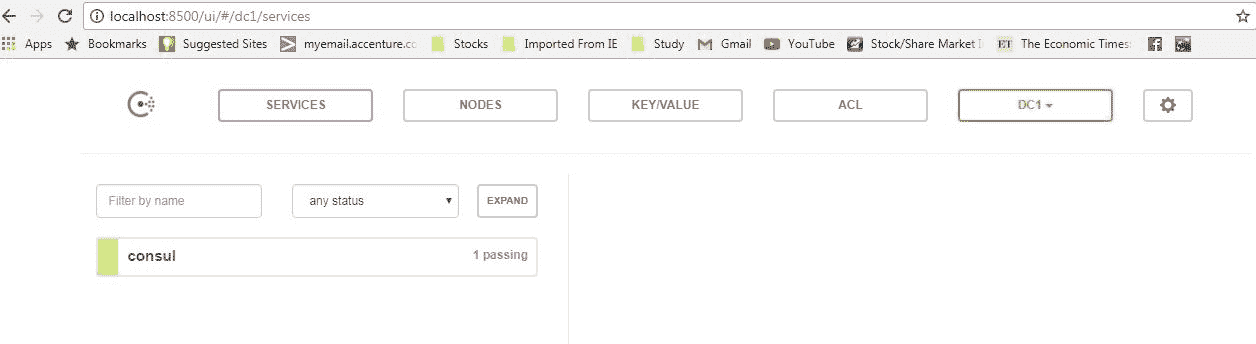
Consul 控制台 – 没有注册服务
因此,我们已经在本地计算机中配置了 consul,并且 consul 代理已成功运行。 现在,我们需要创建客户端并测试服务注册表和发现部分。
学生服务
请按照以下步骤创建和运行学生服务。 这将是一个发现客户端,将其注册到现在已经在我们的计算机中运行的 Consul 服务。
创建学生项目
从具有四个依赖项的初始化器页面创建一个 Spring Boot 项目。
- 执行器
- 网页
- REST 存储库
- Consul 发现
给出其他 Maven GAV 坐标并下载项目。
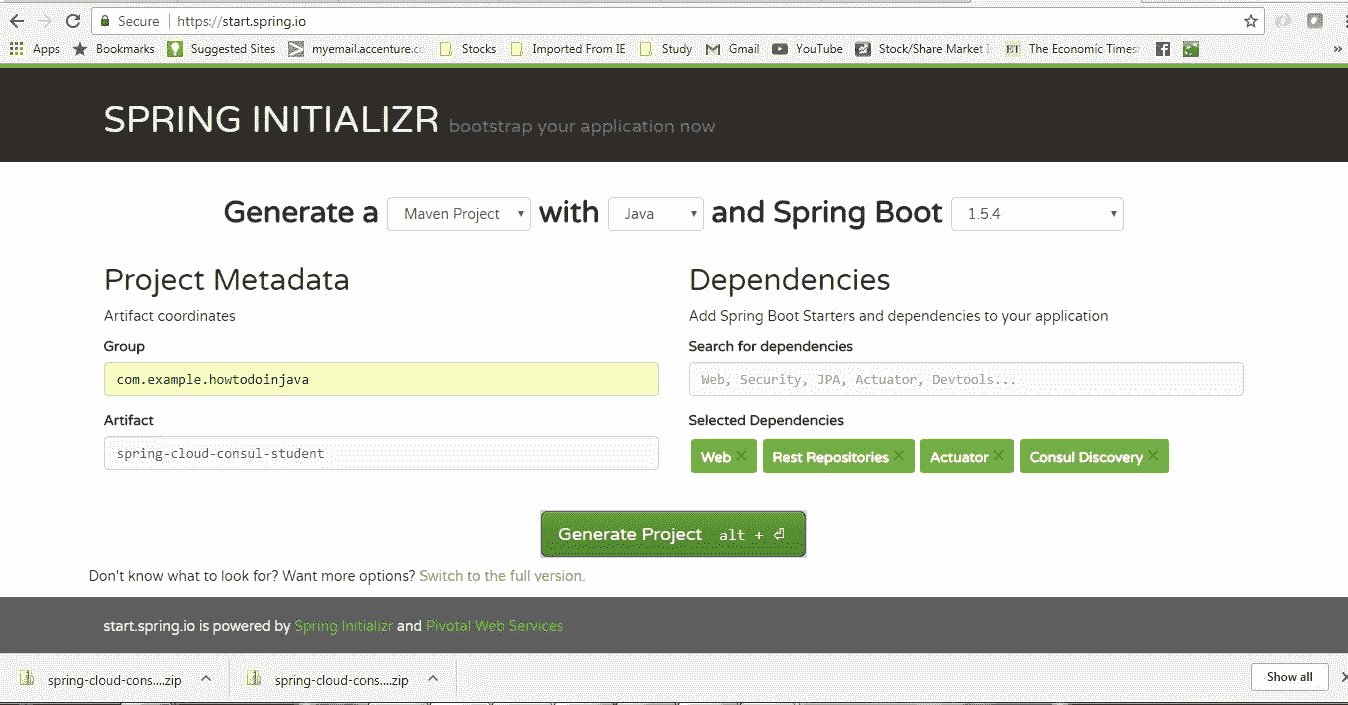
学生服务项目生成
将项目解压缩并将其作为现有的 maven 项目导入 Eclipse。
现在,在src文件夹中的 Spring 运行应用程序类上添加@org.springframework.cloud.client.discovery.EnableDiscoveryClient注解。 有了此注解,此工件将像 Spring 发现客户端一样发挥作用,并在连接到此服务的 Consul 服务器中注册自己。
package com.example.howtodoinjava.springcloudconsulstudent;

import org.springframework.boot.SpringApplication;
import org.springframework.boot.autoconfigure.SpringBootApplication;
import org.springframework.cloud.client.discovery.EnableDiscoveryClient;

@SpringBootApplication
@EnableDiscoveryClient
public class SpringCloudConsulStudentApplication {

	public static void main(String[] args) {
		SpringApplication.run(SpringCloudConsulStudentApplication.class, args);
	}
}
服务配置
打开application.properties并添加以下属性
server.port=9098
spring.application.name: student-service
management.security.enabled=false
这是每个属性的详细信息:
server.port=9098– 将在默认的 9098 端口中启动服务。spring.application.name: student-service– 将使用student-service标签在 Consul 服务器中注册自己,其他服务也将使用此名称本身查找该服务。management.security.enabled=false– 此练习实际上不是必需的,但是它将在执行器模块提供的管理端点中禁用 SpringSecurity。
添加 REST API
现在添加一个RestController并公开一个剩余端点,以获取特定学校的所有学生详细信息。 在这里,我们公开/getStudentDetailsForSchool/{schoolname}端点来满足业务目的。 为简单起见,我们正在对学生详细信息进行硬编码。
package com.example.howtodoinjava.springcloudconsulstudent.controller;

import java.util.ArrayList;
import java.util.HashMap;
import java.util.List;
import java.util.Map;

import org.springframework.web.bind.annotation.PathVariable;
import org.springframework.web.bind.annotation.RequestMapping;
import org.springframework.web.bind.annotation.RequestMethod;
import org.springframework.web.bind.annotation.RestController;

import com.example.howtodoinjava.springcloudconsulstudent.domain.Student;

@RestController
public class StudentServiceController {

	private static Map<String, List<Student>> schooDB = new HashMap<String, List<Student>>();

	static {
		schooDB = new HashMap<String, List<Student>>();

		List<Student> lst = new ArrayList<Student>();
		Student std = new Student("Sajal", "Class IV");
		lst.add(std);
		std = new Student("Lokesh", "Class V");
		lst.add(std);

		schooDB.put("abcschool", lst);

		lst = new ArrayList<Student>();
		std = new Student("Kajal", "Class III");
		lst.add(std);
		std = new Student("Sukesh", "Class VI");
		lst.add(std);

		schooDB.put("xyzschool", lst);

	}

	@RequestMapping(value = "/getStudentDetailsForSchool/{schoolname}", method = RequestMethod.GET)
	public List<Student> getStudents(@PathVariable String schoolname) {
		System.out.println("Getting Student details for " + schoolname);

		List<Student> studentList = schooDB.get(schoolname);
		if (studentList == null) {
			studentList = new ArrayList<Student>();
			Student std = new Student("Not Found", "N/A");
			studentList.add(std);
		}
		return studentList;
	}
}
Student.java模型
package com.example.howtodoinjava.springcloudconsulstudent.domain;

public class Student {
	private String name;
	private String className;

	public Student(String name, String className) {
		super();
		this.name = name;
		this.className = className;
	}

	public String getName() {
		return name;
	}

	public void setName(String name) {
		this.name = name;
	}

	public String getClassName() {
		return className;
	}

	public void setClassName(String className) {
		this.className = className;
	}
}
验证学生服务
作为 spring boot 应用程序启动该项目。 现在,确认此服务已在 Consul 服务器中自动注册。 转到 Consul 代理控制台并刷新页面。 现在,如果一切顺利,我们将在 Consul 代理控制台中看到student-service的一项。
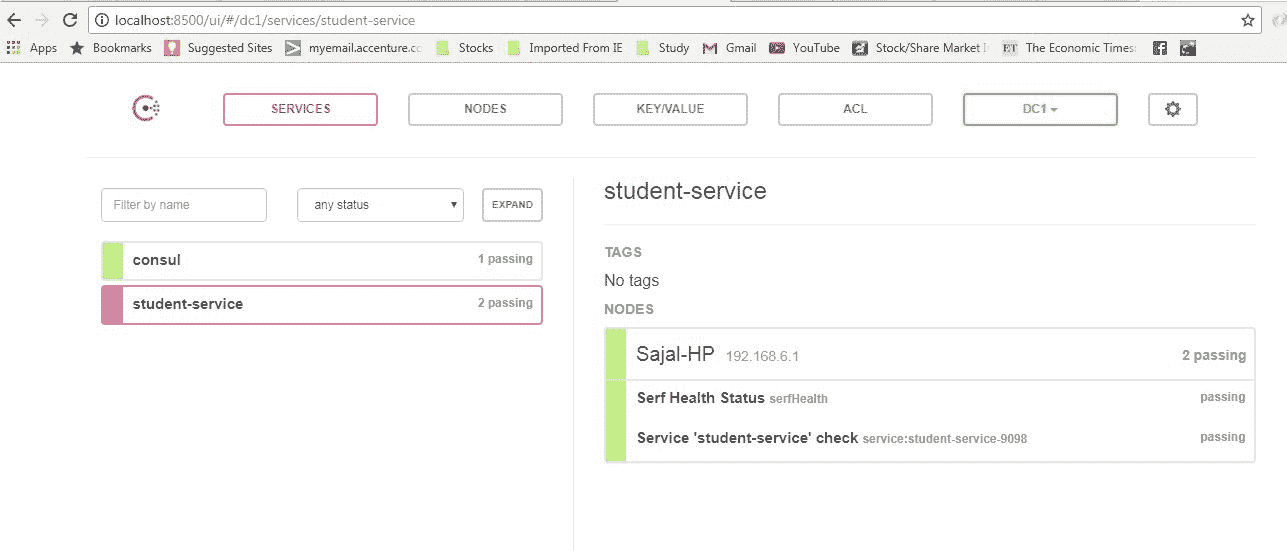
Consul 控制台的学生服务注册
这表明 Consul 服务器和客户端都相互了解,这是 Consul 服务器和学生服务之间发生的一种自动注册和发现。
现在,我们将验证/getStudentDetailsForSchool/{schoolname}端点是否已启动并正在运行。 转到浏览器并转到http://localhost:9098/getStudentDetailsForSchool/abcschool,它将为特定学校abcschool提供学生详细信息。
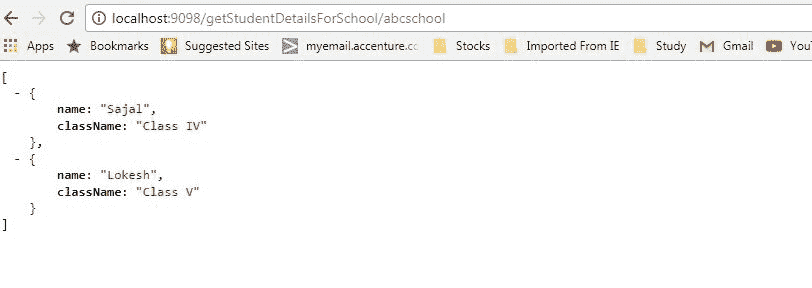
学生服务响应
学校服务 – 发现客户端
现在,我们将创建学校服务,该服务将在 Consul 服务器中进行注册-它将发现并调用没有硬编码 URL 路径的学生服务。
请按照相同的步骤创建和运行学校服务。 这将是一个发现客户端,将其注册到现在已经在我们的计算机中运行的 Consul 服务。
它将内部调用已开发的学生服务,并将使用 Consul 服务发现功能来发现学生实例。
创建学校项目
从具有四个依赖项的初始化器页面创建一个 Spring Boot 项目。
- 执行器
- 网页
- REST 存储库
- Consul 发现
给出其他 Maven GAV 坐标并下载项目。
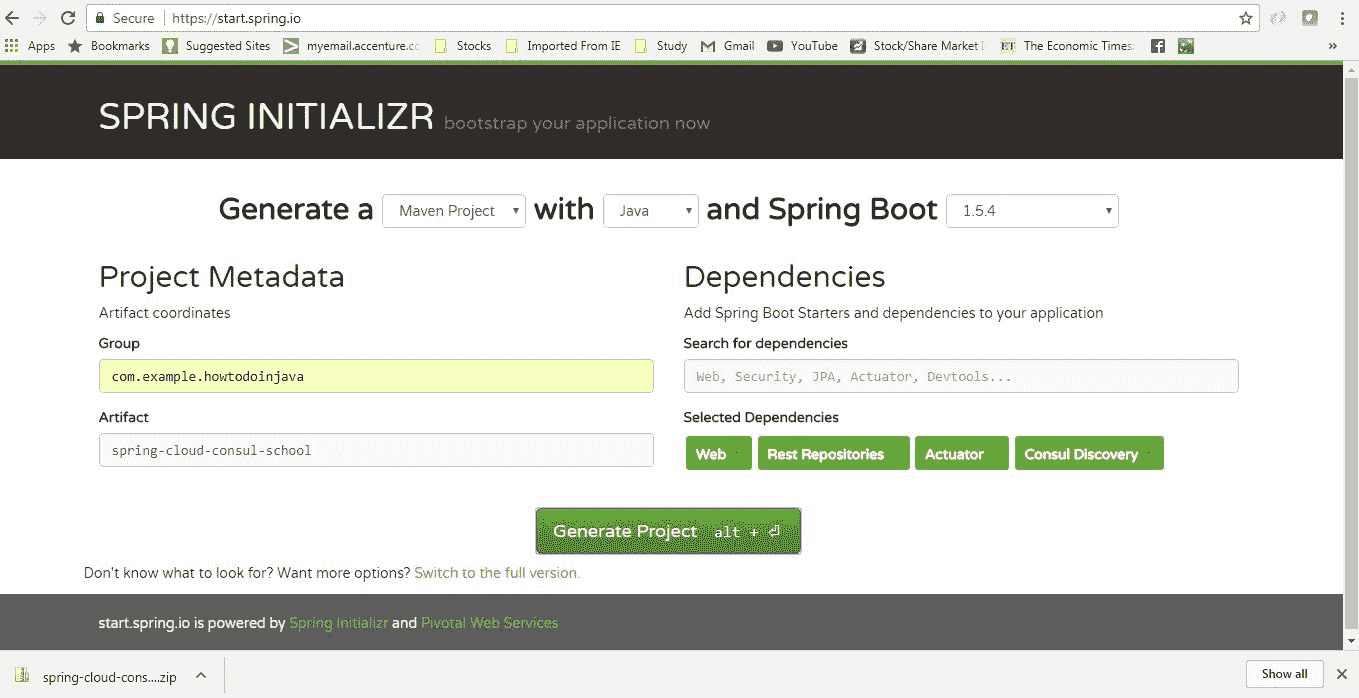
学校生成
将项目解压缩并将其作为现有的 maven 项目导入 Eclipse。
现在,在src文件夹中的 Spring 运行应用程序类上添加@org.springframework.cloud.client.discovery.EnableDiscoveryClient注解。 有了此注解,此工件将像 Spring 发现客户端一样发挥作用,并在连接到此服务的 Consul 服务器中注册自己。
package com.example.howtodoinjava.springcloudconsulschool;

import org.springframework.boot.SpringApplication;
import org.springframework.boot.autoconfigure.SpringBootApplication;
import org.springframework.cloud.client.discovery.EnableDiscoveryClient;

@EnableDiscoveryClient
@SpringBootApplication
public class SpringCloudConsulSchoolApplication {

	public static void main(String[] args) {
		SpringApplication.run(SpringCloudConsulSchoolApplication.class, args);
	}
}
服务配置
打开application.properties并添加以下属性
server.port=8098
spring.application.name: school-service
management.security.enabled=false
这是每个属性的详细信息:
server.port=8098– 将在默认的 8098 端口中启动服务spring.application.name: school-service– 将使用school-service标签在 Consul 服务器中注册自己。management.security.enabled=false– 将在执行器模块提供的管理端点中禁用 SpringSecurity。
添加使用学生服务的 REST API 的 REST API
现在添加一个RestController,并公开一个 REST 点以获取学校详细信息。 该端点将使用带有应用程序名称的服务发现样式 URL,而不是带有host:port的完整 URL 约定。
SchoolServiceController.java
package com.example.howtodoinjava.springcloudconsulschool.controller;

import org.springframework.beans.factory.annotation.Autowired;
import org.springframework.web.bind.annotation.PathVariable;
import org.springframework.web.bind.annotation.RequestMapping;
import org.springframework.web.bind.annotation.RequestMethod;
import org.springframework.web.bind.annotation.RestController;
import com.example.howtodoinjava.springcloudconsulschool.delegate.StudentServiceDelegate;

@RestController
public class SchoolServiceController {

	@Autowired
	StudentServiceDelegate studentServiceDelegate;

	@RequestMapping(value = "/getSchoolDetails/{schoolname}", method = RequestMethod.GET)
	public String getStudents(@PathVariable String schoolname)
	{
		System.out.println("Going to call student service to get data!");
		return studentServiceDelegate.callStudentServiceAndGetData(schoolname);
	}
}
StudentServiceDelegate.java
package com.example.howtodoinjava.springcloudconsulschool.delegate;

import java.util.Date;
import org.springframework.beans.factory.annotation.Autowired;
import org.springframework.cloud.client.loadbalancer.LoadBalanced;
import org.springframework.context.annotation.Bean;
import org.springframework.core.ParameterizedTypeReference;
import org.springframework.http.HttpMethod;
import org.springframework.stereotype.Service;
import org.springframework.web.client.RestTemplate;

@Service
public class StudentServiceDelegate
{
	@Autowired
	RestTemplate restTemplate;

	public String callStudentServiceAndGetData(String schoolname)
	{
		System.out.println("Consul Demo - Getting School details for " + schoolname);

		String response = restTemplate.exchange("http://student-service/getStudentDetailsForSchool/{schoolname}", 										HttpMethod.GET, null, new ParameterizedTypeReference<String>() {}, 												schoolname).getBody();

		System.out.println("Response Received as " + response + " -  " + new Date());

		return "School Name -  " + schoolname + " :::  Student Details " + response + " -  " + new Date();
	}

	@Bean
	@LoadBalanced
	public RestTemplate restTemplate() {
		return new RestTemplate();
	}
}
看上面的代码。 在StudentServiceDelegate中,我们使用RestTemplate调用学生服务,并将学生服务的 URL 用作http://<font color="RED">student-service/getStudentDetailsForSchool/{schoolname}。
这样,我们就可以摆脱特定的服务配置,并且可以将服务查找职责赋予consul服务器和此处提供的其余模板。 如果多个实例正在为同一服务运行,我们也可以在此处应用负载平衡(请参阅@LoadBalanced注解)。
示例
逐步执行以下步骤以了解整个过程:
- 检查 Consul Agent 是否仍在运行 – 打开浏览器,然后浏览
http://localhost:8500/ui。 它应该显示如上所述的 Consul 控制台。 - 检查学生服务是否已运行 – 从 Consul 管理页面和浏览器中检查学生服务是否已启动并正在运行。 如果没有启动该服务,并验证它已在 Consul 服务器中注册。
- 启动并检查学校服务 – 从命令提示符启动学校服务,并检查它是否已在 Consul 服务器中注册。
-
打开浏览器并使用 URL
http://localhost:8098//getSchoolDetails/abcschool测试学校 REST 服务。 它将给出以下响应,并将使用 Consul 服务在内部调用学生服务。
学校服务响应
-
还可以尝试通过
java -jar "-Dserver.port=9099 target\spring-cloud-consul-student-0.0.1-SNAPSHOT.jar更改端口来启动多实例学生服务。这些服务也将在consul 中注册,并且因为我们在RestTemplate中使用@LoadBalanced注解,负载平衡也将在内部完成,请检查相应的学生服务控制台以确认在多实例场景中调用了哪个实例。一旦我们注册了多个服务和多个实例,Consul 服务器的外观将如此。
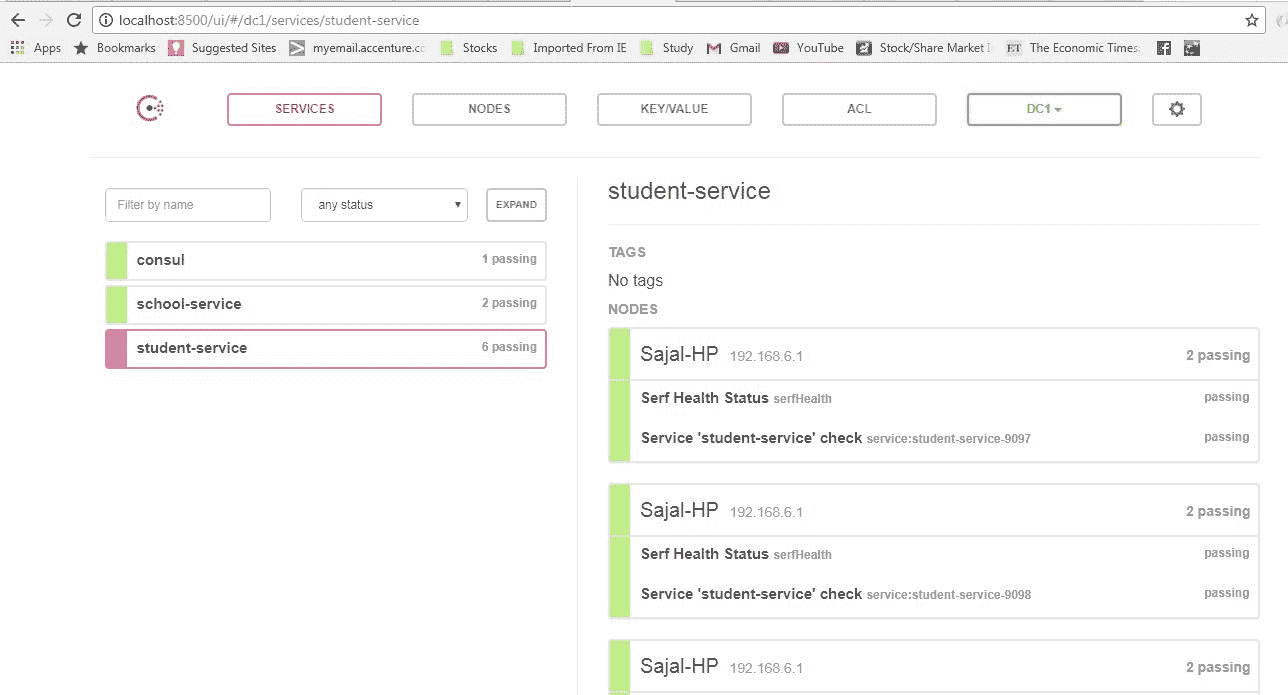
Consul 所有服务正在运行
检查是否遇到任何错误的内容
- 注解
@EnableDiscoveryClient和 Consul 代理运行是应用程序生态系统的核心。 没有这两个东西将根本无法工作。 - 确保在启动学校服务,学生服务,Consul 服务器时,代理已在运行,否则可能要花一些时间进行注册,并且在测试时可能会造成混淆。
总结
我们看到了如何高效地部署 Consul 服务注册表和发现服务器以及客户端。 Spring 框架在内部维护着很多东西。 在这里,我们仅使用几个注解和非常少的配置即可快速完成所有操作。
这就是为 spring 服务创建微服务的服务。
如果您在执行本文时遇到任何困难,请添加注解。 我们将很乐意调查这个问题。
祝您学习愉快!