Spring Boot – CRUD 应用程序
原文: https://howtodoinjava.com/spring-boot2/crud-application-thymeleaf/
通过基于 Thymeleaf 和 spring mvc 支持的基于表单的 UI,学习构建支持 CRUD 操作的 Spring Boot Web 应用程序。
1. 概述
在本教程中,我们正在创建具有两个视图的 Web 应用程序:
-
列出所有员工视图 – 以表格形式在 UI 中从数据库显示所有员工。 此外,还有指向“更新”或“删除”任何员工的链接。 该界面还具有一个单独的选项,可以导航到“创建”员工界面。
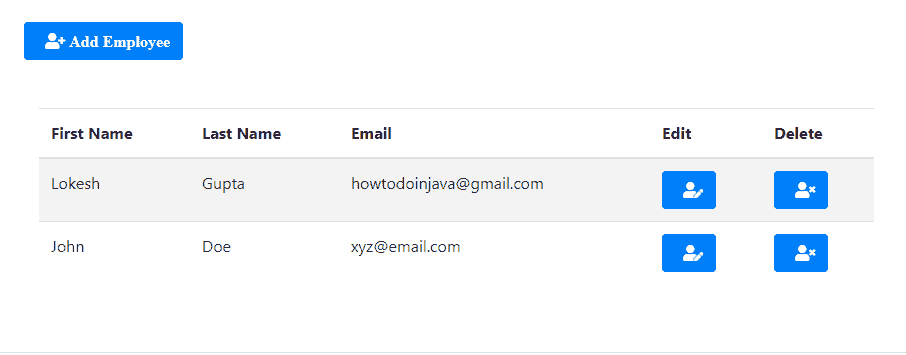
列出所有员工的界面
-
创建/更新员工视图 – 此界面用于添加新员工或编辑现有员工的详细信息。
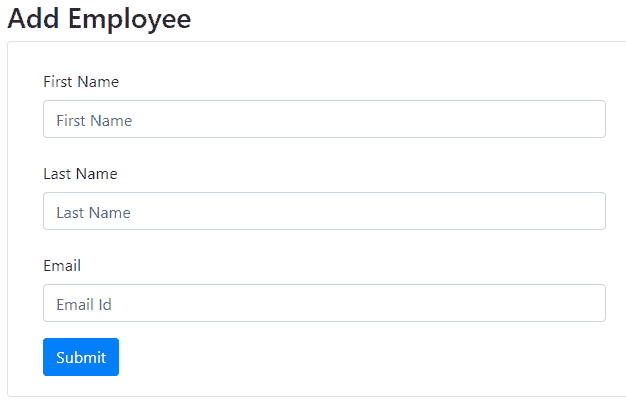
添加员工的界面
此示例中有两个主要组件需要重点关注-MVC 控制器和 UI 视图。
2. Spring MVC 控制器
控制器类具有 URL 映射及其处理器方法。 所有 CRUD 操作都有处理器方法,包括 POST 操作,以处理表单提交以创建/更新员工的过程。
注意给定的处理器方法如何将模型数据绑定到视图; 并且它们以字符串格式返回视图名称,该视图名称由 HTML 文件中的视图解析器解析。
EmployeeMvcController.java
import java.util.List;
import java.util.Optional;

import org.springframework.beans.factory.annotation.Autowired;
import org.springframework.stereotype.Controller;
import org.springframework.ui.Model;
import org.springframework.web.bind.annotation.PathVariable;
import org.springframework.web.bind.annotation.RequestMapping;
import org.springframework.web.bind.annotation.RequestMethod;

import com.howtodoinjava.demo.entity.EmployeeEntity;
import com.howtodoinjava.demo.exception.RecordNotFoundException;
import com.howtodoinjava.demo.service.EmployeeService;

@Controller
@RequestMapping("/")
public class EmployeeMvcController
{
	@Autowired
	EmployeeService service;

	@RequestMapping
	public String getAllEmployees(Model model)
	{
		List<EmployeeEntity> list = service.getAllEmployees();

		model.addAttribute("employees", list);
		return "list-employees";
	}

	@RequestMapping(path = {"/edit", "/edit/{id}"})
	public String editEmployeeById(Model model, @PathVariable("id") Optional<Long> id)
							throws RecordNotFoundException
	{
		if (id.isPresent()) {
			EmployeeEntity entity = service.getEmployeeById(id.get());
			model.addAttribute("employee", entity);
		} else {
			model.addAttribute("employee", new EmployeeEntity());
		}
		return "add-edit-employee";
	}

	@RequestMapping(path = "/delete/{id}")
	public String deleteEmployeeById(Model model, @PathVariable("id") Long id)
							throws RecordNotFoundException
	{
		service.deleteEmployeeById(id);
		return "redirect:/";
	}

	@RequestMapping(path = "/createEmployee", method = RequestMethod.POST)
	public String createOrUpdateEmployee(EmployeeEntity employee)
	{
		service.createOrUpdateEmployee(employee);
		return "redirect:/";
	}
}
getAllEmployees()– 返回所有员工的列表,并映射到路径/。 这是应用程序的默认视图。editEmployeeById()– 用于添加新员工或编辑现有员工。 两种操作都使用相同的 HTML 视图。 如果上下文中有一个员工 ID,则将对该员工进行编辑-否则将创建一个新员工。deleteEmployeeById()– 通过 ID 删除员工的简单 URL 请求。createOrUpdateEmployee()– 此方法处理用于创建新雇员或更新雇员的 HTTP POST 请求。 创建或更新操作取决于模型中是否存在员工 ID。
3. Thymeleaf 模板
如前所述,我们在此示例中使用两个视图。
list-employees.html
<!DOCTYPE html>
<html xmlns:th="http://www.thymeleaf.org">

<head>
    <meta charset="utf-8">
    <meta http-equiv="x-ua-compatible" content="ie=edge">
    <title>All Employees</title>
    <meta name="viewport" content="width=device-width, initial-scale=1">
    <link rel="stylesheet" href="https://stackpath.bootstrapcdn.com/bootstrap/4.1.3/css/bootstrap.min.css">
    <link rel="stylesheet" href="https://use.fontawesome.com/releases/v5.4.1/css/all.css">
</head>

<body>
    <div class="container my-2">
    <div class="card">
    <div class="card-body">
        <div th:switch="${employees}" class="container my-5">
            <p class="my-5">
                <a href="/edit" class="btn btn-primary">
                <i class="fas fa-user-plus ml-2"> Add Employee </i></a>
            </p>
            <div class="col-md-10">
                <h2 th:case="null">No record found !!</h2>
                <div th:case="*">
                    <table class="table table-striped table-responsive-md">
                        <thead>
                            <tr>
                                <th>First Name</th>
                                <th>Last Name</th>
                                <th>Email</th>
                                <th>Edit</th>
                                <th>Delete</th>
                            </tr>
                        </thead>
                        <tbody>
                            <tr th:each="employee : ${employees}">
                                <td th:text="${employee.firstName}"></td>
                                <td th:text="${employee.lastName}"></td>
                                <td th:text="${employee.email}"></td>
                                <td>
                                    <a th:href="@{/edit/{id}(id=${employee.id})}"
                                             class="btn btn-primary">
                                        <i class="fas fa-user-edit ml-2"></i>
                                    </a>
                                </td>
                                <td>
                                    <a th:href="@{/delete/{id}(id=${employee.id})}"
                                              class="btn btn-primary">
                                        <i class="fas fa-user-times ml-2"></i>
                                    </a>
                                </td>
                            </tr>
                        </tbody>
                    </table>
                </div>

            </div>
        </div>
    </div>
    </div>
    </div>
</body>

</html>
add-edit-employee.html
<!DOCTYPE html>
<html xmlns:th="http://www.thymeleaf.org">

<head>
    <meta charset="utf-8">
    <meta http-equiv="x-ua-compatible" content="ie=edge">
    <title>Add Employee</title>
    <meta name="viewport" content="width=device-width, initial-scale=1">
    <link rel="stylesheet" href="https://stackpath.bootstrapcdn.com/bootstrap/4.1.3/css/bootstrap.min.css">
    <link rel="stylesheet" href="https://use.fontawesome.com/releases/v5.4.1/css/all.css">
</head>

<body>
    <div class="container my-5">
        <h3> Add Employee</h3>
        <div class="card">
            <div class="card-body">
                <div class="col-md-10">
                    <form action="#" th:action="@{/createEmployee}" th:object="${employee}"
                                                                       method="post">
                        <div class="row">
                            <div class="form-group col-md-8">
                                <label for="name" class="col-form-label">First Name</label>
                                <input type="text" th:field="*{firstName}" class="form-control"
                                            id="firstName" placeholder="First Name" />
                            </div>
                            <div class="form-group col-md-8">
                                <label for="name" class="col-form-label">Last Name</label>
                                <input type="text" th:field="*{lastName}" class="form-control"
                                            id="lastName" placeholder="Last Name" />
                            </div>
                            <div class="form-group col-md-8">
                                <label for="email" class="col-form-label">Email</label>
                                <input type="text" th:field="*{email}" class="form-control"
                                            id="email" placeholder="Email Id" />
                            </div>

                            <div class="col-md-6">
                                <input type="submit" class="btn btn-primary" value=" Submit ">
                            </div>

                            <input type="hidden" id="id" th:field="*{id}">

                        </div>
                    </form>
                </div>
            </div>
        </div>
    </div>
</body>

</html>
4. 实体和存储库
我们已经将EmployeeEntity类作为模型绑定到 UI。
EmployeeEntity.java
import javax.persistence.Column;
import javax.persistence.Entity;
import javax.persistence.GeneratedValue;
import javax.persistence.Id;
import javax.persistence.Table;

@Entity
@Table(name="TBL_EMPLOYEES")
public class EmployeeEntity {

    @Id
    @GeneratedValue(strategy = GenerationType.IDENTITY)
    private Long id;

    @Column(name="first_name")
    private String firstName;

    @Column(name="last_name")
    private String lastName;

    @Column(name="email", nullable=false, length=200)
    private String email;

    //Setters and getters

    @Override
    public String toString() {
        return "EmployeeEntity [id=" + id + ", firstName=" + firstName +
                ", lastName=" + lastName + ", email=" + email   + "]";
    }
}
为了将数据持久存储在数据库中,我们使用 H2(内存中)数据库,并使用 Spring 数据的CrudRepository接口。 它为简单的 CRUD 操作提供了开箱即用的内置方法。
EmployeeRepository.java
import org.springframework.data.repository.CrudRepository;
import org.springframework.stereotype.Repository;

import com.howtodoinjava.demo.entity.EmployeeEntity;

@Repository
public interface EmployeeRepository
			extends CrudRepository<EmployeeEntity, Long> {

}
请注意,使用两个 SQL 文件初始化了存储库,这两个 SQL 文件创建数据库表并向其中填充默认数据。
schema.sql
DROP TABLE IF EXISTS TBL_EMPLOYEES;

CREATE TABLE TBL_EMPLOYEES (
  id INT AUTO_INCREMENT  PRIMARY KEY,
  first_name VARCHAR(250) NOT NULL,
  last_name VARCHAR(250) NOT NULL,
  email VARCHAR(250) DEFAULT NULL
);
data.sql
INSERT INTO
	TBL_EMPLOYEES (first_name, last_name, email)
VALUES
  	('Lokesh', 'Gupta', 'howtodoinjava@gmail.com'),
  	('John', 'Doe', 'xyz@email.com');
5. 服务类
另一个重要的类是EmployeeService类,控制器通过该类与存储库进行交互。 它包含要执行的其他业务逻辑。
EmployeeService.java
import java.util.ArrayList;
import java.util.List;
import java.util.Optional;

import org.springframework.beans.factory.annotation.Autowired;
import org.springframework.stereotype.Service;

import com.howtodoinjava.demo.entity.EmployeeEntity;
import com.howtodoinjava.demo.exception.RecordNotFoundException;
import com.howtodoinjava.demo.repository.EmployeeRepository;

@Service
public class EmployeeService {

	@Autowired
	EmployeeRepository repository;

	public List<EmployeeEntity> getAllEmployees()
	{
		List<EmployeeEntity> result = (List<EmployeeEntity>) repository.findAll();

		if(result.size() > 0) {
			return result;
		} else {
			return new ArrayList<EmployeeEntity>();
		}
	}

	public EmployeeEntity getEmployeeById(Long id) throws RecordNotFoundException
	{
		Optional<EmployeeEntity> employee = repository.findById(id);

		if(employee.isPresent()) {
			return employee.get();
		} else {
			throw new RecordNotFoundException("No employee record exist for given id");
		}
	}

	public EmployeeEntity createOrUpdateEmployee(EmployeeEntity entity)
	{
		if(entity.getId()  == null)
		{
			entity = repository.save(entity);

			return entity;
		}
		else
		{
			Optional<EmployeeEntity> employee = repository.findById(entity.getId());

			if(employee.isPresent())
			{
				EmployeeEntity newEntity = employee.get();
				newEntity.setEmail(entity.getEmail());
				newEntity.setFirstName(entity.getFirstName());
				newEntity.setLastName(entity.getLastName());

				newEntity = repository.save(newEntity);

				return newEntity;
			} else {
				entity = repository.save(entity);

				return entity;
			}
		}
	}

	public void deleteEmployeeById(Long id) throws RecordNotFoundException
	{
		Optional<EmployeeEntity> employee = repository.findById(id);

		if(employee.isPresent())
		{
			repository.deleteById(id);
		} else {
			throw new RecordNotFoundException("No employee record exist for given id");
		}
	}
}
6. 添加 Spring Boot 和 Thymeleaf Maven 依赖项
在 spring boot 项目中,我们只需要添加spring-boot-starter-thymeleaf依赖项,并使用默认配置为项目本身自动配置 thymeleaf。 它从/src/main/resources/templates文件夹中读取 HTML 模板。
pom.xml
<?xml version="1.0" encoding="UTF-8"?>
<project xmlns="http://maven.apache.org/POM/4.0.0"
	xmlns:xsi="http://www.w3.org/2001/XMLSchema-instance"
	xsi:schemaLocation="http://maven.apache.org/POM/4.0.0 http://maven.apache.org/xsd/maven-4.0.0.xsd">
	<modelVersion>4.0.0</modelVersion>
	<parent>
		<groupId>org.springframework.boot</groupId>
		<artifactId>spring-boot-starter-parent</artifactId>
		<version>2.1.5.RELEASE</version>
		<relativePath /> <!-- lookup parent from repository -->
	</parent>
	<groupId>com.howtodoinjava</groupId>
	<artifactId>demo</artifactId>
	<version>0.0.1-SNAPSHOT</version>
	<name>demo</name>
	<description>Demo project for Spring Boot</description>

	<properties>
		<java.version>1.8</java.version>
	</properties>

	<dependencies>
		<dependency>
			<groupId>org.springframework.boot</groupId>
			<artifactId>spring-boot-starter-web</artifactId>
		</dependency>
		<dependency>
			<groupId>org.springframework.boot</groupId>
			<artifactId>spring-boot-starter-data-jpa</artifactId>
		</dependency>
		<dependency>
			<groupId>org.springframework.boot</groupId>
			<artifactId>spring-boot-starter-thymeleaf</artifactId>
		</dependency>
		<dependency>
			<groupId>com.h2database</groupId>
			<artifactId>h2</artifactId>
			<scope>runtime</scope>
		</dependency>
		<dependency>
			<groupId>org.springframework.boot</groupId>
			<artifactId>spring-boot-starter-test</artifactId>
			<scope>test</scope>
		</dependency>
	</dependencies>
</project>
7. Spring Boot thymeleaf Crud 教程演示
以 Spring Boot 应用程序的形式启动此应用程序,该应用程序将在嵌入式 tomcat 服务器中启动 Web 应用程序。
点击网址:http://localhost:8080/
验证是否使用data.sql文件中的两个默认员工详细信息渲染了屏幕。
玩应用程序。 创建几个新员工,编辑现有员工。 删除一些员工。
如果在上述 spring boot mvc 示例中遇到任何错误,请告诉我。
学习愉快!